
Do you want to deploy a Python app on the Heroku cloud for free? Are you interested in learning the step by step process to transfer any app (or script) from your pc/laptop and deploy it on the cloud platform? You are at the right place, my friend. There are several benefits associated with hosting an application on the cloud, hassle-free execution once deployed successfully, no local pc required, accessible from anywhere, scalable to a larger audience, to name a few. You can either build an application or normally execute a script that does something periodically (it doesn’t necessarily need to be an app). The app (or script) will work as it was running on the pc.
After reading this article, you would be able to understand the end to end process of deploying any app on the Heroku cloud platform. The table of contents shown below help you navigate the entire section seamlessly.
Table of contents
A dedicated video on this topic is available on aipython’s youtube channel. Find the same embedded with this post.
Creating a Github repository & adding files
Creating a repository on GitHub is pretty simple. You can create a repository by following these simple steps along with the image:
- Head over to the Repositories section of your GitHub account
- Click on the New button shown under the repositories tab
- Provide a name & a short description to this repository
- Keep the repo visibility to the public (as per requirement)
- Optional (add readme as well as gitignore file)
- Finally, click on Create Repository button
The new repository with the name Deploy-python-on-heroku (for this article) has been created and now will start adding the necessary files to it.
Understanding each file of the repo
Four necessary files are required to be present in the GitHub repository so that they can be deployed on Heroku. (a short hint: all the files will be pushed from GitHub to Heroku platform during deployment)

- 1) Python code
- 2) runtime.txt
- 3) requirements.txt
- 4) Procfile (without any extension)
Python code file contains the main logic of the program. What to do and how to do it.
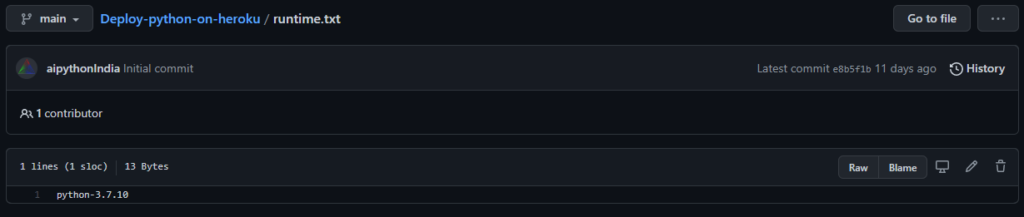
runtime is a text file that contains the program (compiler/Interpreter) for executing the code along with the version. The content of this runtime.txt is shown in the section below.
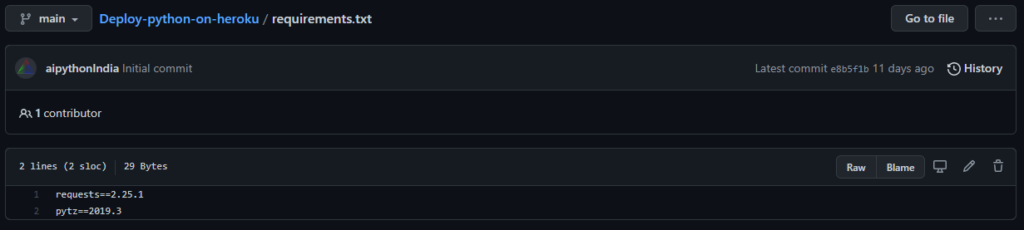
requirements is another text file that contains the list of all third party libraries along with their version being used by python code. Heroku will use this file to install all these libraries during the deployment phase to smoothly process the script.
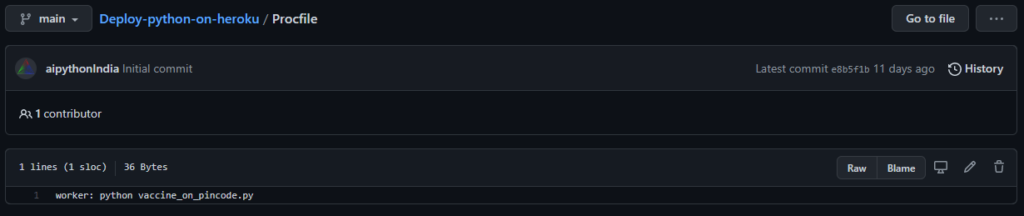
Procfile is a special type of file, without having any extension, that specifies the worker. It should be written in such a way that Heroku understands who is going to execute what. When you look at the screenshot shown below, of the Procfile, used in this article.
Creating Application on Heroku
Heroku is a cloud application platform that allows you to build, deploy and manage an application on its premise. It primarily supports 8 languages as of Sep 2021 (that may increase with time).
You can create an account for free on Heroku, so go ahead and create an account if you don’t have one. After login, you will be redirected to the dashboard and there you will find a button to ‘Create new app’. Choose a name for your app and let the region be the United States by default (it does not matter) and then click Create app.
Deploying the code via Github repository
You will be redirected to the Deploy tab directly, where you can choose the deployment method as GitHub and click on the icon to connect to an existing GitHub. It will ask you the exact repository to be connected and synced. Once you connect the icon will have a green tick to ensure that it is properly connected with the Heroku platform.
Next comes the automatic deploy option, you can choose to deploy the code directly from GitHub and also in future whenever any commits happen on the selected branch, the new changes will automatically be fetched and gets deployed. Click on manual deploy for the first time, in order to deploy the current state of the branch.
You will see an integrated terminal appearing just next to the section and a few of the activities are happening, as shown below. Building Process will start with various options like,
- Installing version of Pyhton mentioned in runtime.txt
- Installing other necessary components such as pip, setuptools, wheel etc..
- Then it will install all the third-party packages mentioned in requirements.txt
- Finally, you will see a line at the end saying ‘deployed to Heroku’.
You can view the detailed version of this terminal by clicking on the ‘view build log‘ or alternatively visiting the ‘Activity’ tab.
Enabling Dyno to start the app
Dyno is the Runtime engine that powers your application (it is analogous to the dyno that helps to test the vehicle in the lab). Heroku provides Dyno with various specifications and the good news is there also exits a Free Dyno, of course with certain limitations in terms of usage. But it is more than enough to test your application.
To enable a free Dyno, head over to the ‘Resource‘ tab and slide the button to turn it on and click confirm button.
Yeah !! You did it.
Congratulations your application is deployed on Cloud.
⚙️My Gadget setup for productivity
Recording Mic | SSD for fast Operation | Power Bank | Desktop Monitor | USB 4.0 Hub | Whiteboard (wall-mount)
Further
After reading this article, you have understood to build and deploy an application on the Heroku cloud for free. Although, this is one of the application types that you have learnt and it’s time to think about various other types of Python projects that you can build such as tracking Bitcoin price/stock price or setting the price alert for an item on an eCommerce platform and many others.
#Heroku #aipython #telegram #github #bitcoin #crypto #app # cloud
