
Jupyter notebook is an open-source, lightweight and browser-based IDE. It is a kind of web app that allows to write and execute Python code in a browser (Chrome, Safari and Firefox). The notebook extends the console-based approach to interactive computing in a qualitatively new direction, providing a web-based application suitable for capturing the whole computation process: developing, documenting, and executing code, as well as communicating the results.
You might be familiar with the Jupyter notebook or you might not be. Even if you have very limited or almost no knowledge about Jupyter Notebook then no need to worry. I will be starting from scratch and by the end of this tutorial, you will be familiar as well as comfortable with the Jupyter notebook. Many a time Jupyter Notebook is also simply called as Notebook.
You can navigate to any Topic using the content outline present below,
- What is Jupyter notebook
- Why Jupyter Notebook
- Installing Jupyter Notebook
- Launching Jupyter Notebook
- Understanding Jupyter Notebook’s Interface
- Keyboard shortcuts for Jupyter Notebook
What is Jupyter Notebook
To work efficiently with any programming language, you need an IDE. An IDE stands for Integrated Development Environment, which is, collection of a compiler (or interpreter), a code-editor and a Debugger. Typically, all of them are packaged together as one software and known as an IDE. Generally, an IDE supports multiple languages. When it comes to choosing IDE for Python, there are numerous options such as VScode from Microsoft, Anaconda navigator, Spyder, PyCharm from JetBrains and many others. Every IDE has its advantage, applications and limitations. One IDE is preferred over others based on convenience and the type of application.
Jupyter is named after the three programming languages which are Julia, Python and Ruby. In the beginning, Jupyter notebook only supports these three languages, but as of today (Jul 2020), it has grown to support over 40 programming languages.
Properties of Jupyter Notebook
- Open-source means no restriction on the usage and one can get it absolutely free. Open-source software is managed by a team of dedicated developers, working actively to fix all the existing bugs as well as releasing the updated software.
- Lightweight IDE often consumes less memory while being in the operation. Some IDE like PyCharm and Anaconda consumes a large portion of the RAM. Jupyter notebook doesn’t consume so much memory.
- The notebook is a browser-based IDE, which means there is no typical desktop application. It’s a web application (or a browser-based tool) for interactive authoring of documents that combine explanatory text, mathematics, computations and a superior media output.
- Code and result simultaneously in the same cell. When you execute the code, the result will be displayed next to it. You will learn more about the cell and other features of Notebook in the next section.
- Commentary along with code using Markdown: With the help of Markdown in the web browser, the user can enter a description of a particular section. This description can also be referred to as comments, but these are different from the conventional comment in python (usually with #). Markdowns are used to write a comment for a particular section and there is no limit on using the number of markdowns.
- Interacting with the generated output: Notebook allows to display figures and plot generated by matplotlib. The inline method (%matplotlib inline) used in a notebook environment allows plotting a static graph whereas the notebook method (%matplotlib notebook) allows plotting in a native matplotlib interactive environment. You will see the actual use case while plotting a 3-Dimensional surface plot.
- Exporting Notebook file in various formats: Jupyter Notebook file is saved with the extension ipynb. A Notebook can be converted to multiple formats such as PDF, Python file, HTML, LaTeX, Markdown and Ascii. Availability of code in multiple formats provides the flexibility to share and showcase the code.
Why Jupyter Notebook
After knowing the features of Jupyter Notebook, you would have probably understood the reason behind its popularity. Here are a few reasons to choose Jupyter Notebook
- The lightweight, browser-based web application
- Intuitive interface to write code and see the result in the same cell (block)
- Easy to debug the code block by block and update
- Interactive visualization support
- Code can be exported in multiple formats such as PDF, html file, Python script file and many more.
Installing Jupyter Notebook
Until now, you would have learned about some of the prominent features and the advantage of using Jupyter Notebook, especially for data visualization. Now, you will know the installation process. I will guide you through the installation process as well as the configuration of the Jupyter Notebook on your system. I will be using PIP to install Jupyter Notebook.
Note: Jupyter Notebook comes pre-installed with the Anaconda package, since we have not recommended you to install it, therefore you have to install it manually.
Open the command prompt (Windows button + R, type in ‘cmd’ and hit enter) and then write
pip install jupyter notebookand press Enter key, installation takes time (it may vary from 30 seconds to 1.5 min) depending upon the internet speed.
You can verify the installation by using the PIP command, here is how to verify
pip show jupyter notebookThis pip command will show everything about the package (if it has been installed correctly) such as name, installed version, Author, license and few more things. If the package has not been installed correctly, you will see an error,
“WARNING: package(s) not found: jupyter notebook“
Launching Jupyter Notebook
The simplest but least used method to open the Jupyter Notebook is by writing “jupyter notebook” in the command prompt as illustrated below
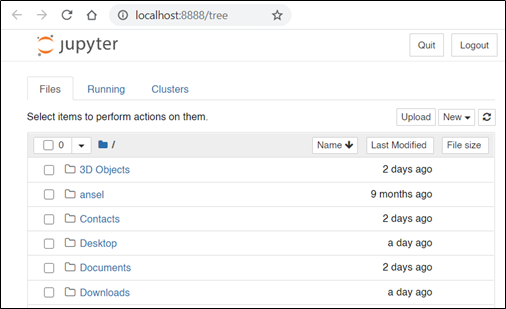
jupyter notebookThis will invoke a Jupyter Notebook web-app in the default web-browser with default location. The url of the web-app will be “localhost:available_port/tree” port number will be any available port but in most of the cases it is 8888,
You may choose to start Jupyter notebook with above mentioned way, however this is not the recommended because
- The default loaded location does not provide flexibility to navigate to other directories (where your project resides) from the current.
- Even if the project is located in one of the folder (in the current directory), you have to manually navigate to the location
To overcome this issue, we have discussed the two most effective and frequently used method to launch Jupyter Notebook, which are
- Launch Jupyter Notebook using a batch (.bat) script
- Launch Jupyter Notebook directly from the respective folder
Open Jupyter Notebook using batch (.bat file) script
You might be aware of the batch (.bat) file, which contains the certain command(s) that windows OS understand and you can execute it by just double-clicking the file. I am going to create a similar batch file, which will start jupyter notebook.
Step1: Create an empty file (.txt) anywhere in your system
Step2: Write the following line; replace “folder_location” (should be under double quotes) with desired folder location.
jupyter notebook --notebook-dir="folder_location"Step3: Save the file with any name you like and replace the .txt extension with .bat.
Step4: Double click the batch file; it will open up the Jupyter Notebook with the location you have provided.
Note: You can set the default start location of Notebook by editing the respective batch file.
Launch Notebook from a specific folder
This method is my favorite way to launch the Jupyter Notebook.
Step1: Browse to a desired location and click on the windows browser (where the current windows path appears)
Step2: Type cmd by replacing all the items in that location and hit enter. It will open up a command prompt with the current folder location as the current directory.
Step3: Type “jupyter notebook” (without quotes) and hit enter, it will open up the Jupyter Notebook web-app showing all the content of that folder.
Note: In both of the above cases, a local server is created in the background and the status of the server keeps on updating with every change you make in Notebook. The status of Jupyter Notebook server is available in command prompt and DO NOT close the command prompt until you are done using the web-app.
Creating a new Python file in Notebook
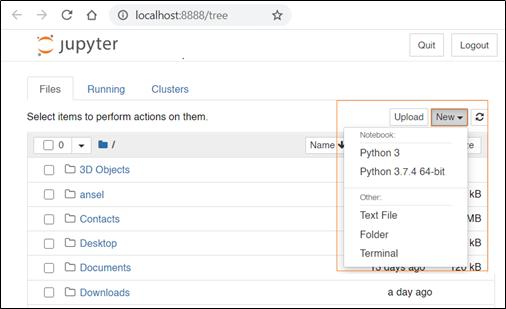
Jupyter Notebook allows you to create multiple types of file and Python is one of them. You can create a new Python (it would also display the version if installed) file by clicking on the “New” button and select from the drop-down menu
Understanding Jupyter Notebook’s Interface
After creating the file, you will see an interface similar to the one shown in Figure 1.5. Since Notebook is a web-app, everything will be available in a web browser. Like any other web apps, Jupyter Notebook also has a defined user interface (shown in Figure 1.3) with lots of components such as file name, Menu bar, Toolbar, input cell etc.…
On the top just beside the Jupyter Notebook logo, you can see the name of the current file (book_code in this case). The name can be edited by double-clicking over it. Towards the extreme right, after Python’s logo, is the Logout button which terminates the program. Below the logout button is the Interpreter detail
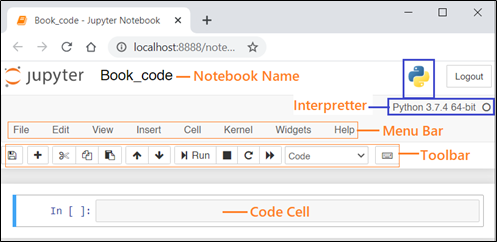
Menu bar contains some of the traditional menu such as File, Edit, View, Insert, Cell, Kernel, Widgets and Help. Toolbar contains lot of quick tool buttons, which you will come across many times, such as save, add, cut, paste, move-up/down, run/execute, restart the kernel, restart followed by re-run, cell type converter as well as shortcut to open command palette. In the end you will see the main part of Notebook, which is the code cell for writing and editing the code.
Every cell in Jupyter Notebook poses three different types of behavior or you can say every cell can be converted interchangeably into 3 different types which are,
Code Cell
Markdown Cell
Raw Cell
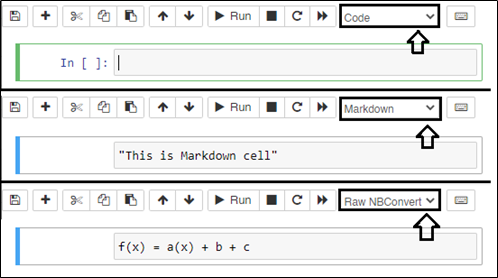
Code Cell
By default, a cell is always in Code cell mode (green border). A code cell allows you to edit and write new code, with full syntax highlighting and tab completion. When a code cell is executed, code that it contains is sent to the kernel associated with the notebook. The results that are returned from this computation are then displayed in the notebook as the cell’s output.
Markdown Cell
Text can be added to Jupyter Notebooks using Markdown cells. A cell can be converted to Markdown mode by selecting Markdown from the toolbar (alternatively by pressing esc button followed by “M” key on the keyboard), to write text and comments. You can document the computational process in a literate way, alternating descriptive text with code, using rich text.
The Markdown language provides a simple way to perform this text markup, that is, to specify which parts of the text should be emphasized (italics), bold, form lists, etc. The Middle section of the above Figure shows a Markdown cell. If you want to provide structure for your document, you can use markdown headings. Markdown headings consist of 1 to 6 hash # signs # followed by a space and the title of your section. The markdown heading will be converted to a clickable link for a section of the notebook. It is also used as a hint when exporting to other document formats, like PDF. When a Markdown cell is executed, the Markdown code is converted into the corresponding formatted rich text. Markdown allows arbitrary HTML code for formatting.
Raw Cell
Raw cells provide a place in which you can write output directly. Raw cells are not evaluated by the notebook. When passed through nbconvert, raw cells arrive in the destination format unmodified. For example, you can type full LaTeX into a raw cell, which will only be rendered by LaTeX after conversion by nbconvert. Lower section of Figure 1.4, shows a Raw cell.
Keyboard shortcuts for Jupyter Notebook
Keyboard shortcuts are always act as a helping hand to speed up you’re coding and you should incorporate this habit in your programming as well. We all have been using the keyboard shortcuts for our daily task be it a copy (Ctrl+c), paste (Ctrl+v), cut (Ctrl+x) and many others. Jupyter Notebook also facilitates the use of Keyboard shortcuts and they are already defined with the application. However, it also allows a user to customize the shortcuts (change the key combination) as per their convenience.
menu bar > help -> Keyboard shortcutsIn this section, you will see a handful of keyboard shortcuts that will help you get things faster & easier. I am not going to discuss each one of them but at the same time you can access the complete list from the web app menu by navigating to,
| Keyboard Shortcut | Function |
| Shift-Enter | Run cell, select below |
| Ctrl-Enter | Run selected cells |
| Ctrl+’/’ | Comment and Uncomment |
| Ctrl-S | Save and Checkpoint |
| Tab | Code completion or indent |
| Shift-Tab | Tooltip |
| Ctrl-A | Select all |
| Ctrl-Z | Undo |
| Ctrl-U | Undo selection |
| Ctrl-Y | Redo |
| Ctrl-D | Delete complete line |
| Ctrl-Backspace | Delete word before |
| Ctrl-M | Enter command mode |
| ESC | Enter command mode |
| Ctrl-Shift-P | Open the command palette |
For your information, there are two modes of operation and we will be focusing on the normal mode, which is Edit mode. I am sure that you will find these keyboard shortcuts pretty handy and useful to work efficiently with Jupyter Notebook.
